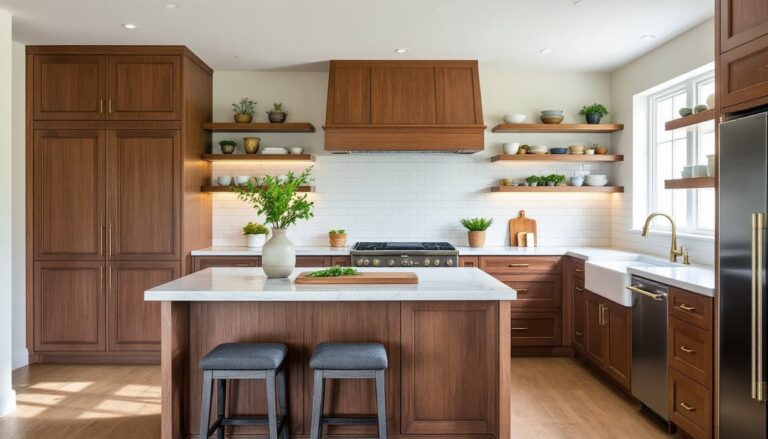

Transitional kitchen design sits at the sweet spot between traditional warmth and modern simplicity. It’s not about choosing sides, it’s about borrowing the best from both worlds and creating a space that feels timeless, functional, and uniquely yours. If you’re tired of stark minimalism but don’t want your kitchen stuck in a single era, transitional style offers flexibility without chaos. This approach gives homeowners room to evolve their taste over time while maintaining a cohesive look. Whether you’re planning a full renovation or refreshing key elements, understanding the core principles of transitional design will help you make smart, lasting choices.
Table of Contents
ToggleKey Takeaways
- Transitional kitchen design combines the clean lines of modern style with the warmth and comfort of traditional interiors, creating a timeless aesthetic that works well for long-term homeowners and those planning to sell.
- Neutral color palettes—whites, grays, and taupes—layered with subtle depth and minimal black or charcoal accents are essential to transitional kitchen design, while bold patterns and jewel tones should be avoided.
- Shaker cabinets paired with simple hardware (bar pulls, cup knobs in brushed nickel or matte black) form the foundation of transitional kitchens, striking the right balance between traditional and contemporary styles.
- Subway tile backsplashes, quartz or granite countertops, and wide-plank engineered hardwood or luxury vinyl flooring create the durable, restrained material palette that defines transitional kitchen style.
- Multi-zone lighting—combining recessed cans for ambient light, pendant fixtures over islands at 30–36 inches, and under-cabinet LED strips for task work—allows functional and adaptable illumination without sacrificing style.
- Transitional kitchens reward thoughtful planning and editing: prioritize quality over quantity, maintain balance over extremes, and let one or two statement elements stand out while keeping the rest understated.
What Is Transitional Kitchen Design?
Transitional design merges the clean lines and streamlined forms of contemporary style with the comfortable detailing and warmth of traditional interiors. Think of it as the middle ground: no ornate moldings or carved corbels, but also no ultra-sleek handleless cabinets or industrial starkness.
The hallmark is balance. Transitional kitchens pair simple Shaker-style cabinets with modern hardware, classic subway tile with contemporary lighting, or a farmhouse sink with quartz countertops. The result feels current but not trendy, grounded but not dated.
This style works especially well for homeowners who plan to stay in their homes long-term or who want broad buyer appeal if resale is on the horizon. It’s forgiving, you can layer in personal touches, swap out accessories, or update finishes without overhauling the entire design. Transitional kitchens don’t scream for attention: they adapt.
Key Elements of Transitional Kitchen Style
Transitional kitchens rely on a few foundational elements that create cohesion without rigidity. Get these right, and the rest falls into place.
Color Palettes That Define Transitional Kitchens
Neutral palettes dominate, whites, grays, taupes, and soft beiges, but transitional design doesn’t mean boring. Layering different tones of the same color family adds depth without clutter. A popular combination: white upper cabinets, medium gray lowers, and a greige (gray-beige) backsplash.
Black or charcoal accents work well as grounding elements: cabinet hardware, light fixtures, or a matte black faucet. Avoid high-contrast drama (stark black-and-white checkerboards, for example) unless you’re leaning more contemporary. For warmth, introduce natural wood tones through flooring, open shelving, or bar stools.
Some homeowners add a single accent color, navy island cabinets, a sage green backsplash, but keep it muted. Jewel tones and bold patterns pull the design too far traditional or eclectic. Stick with one or two accent elements max.
Cabinetry and Hardware Choices
Shaker cabinets are the workhorse of transitional kitchens. The flat center panel with a simple frame reads clean and unfussy, bridging old and new. Avoid heavy raised panels (too traditional) or completely flat slab doors (too modern).
Finish matters. Painted cabinets in white, soft gray, or greige are most common, but stained wood in walnut or oak tones can ground the space if you balance it with lighter countertops and backsplash. Mix finishes sparingly, say, painted perimeter cabinets with a stained island, to avoid a disjointed look.
Hardware is where many DIYers slip up. Choose simple profiles: bar pulls, cup pulls, or round knobs in brushed nickel, matte black, or aged brass. Skip anything too ornate (scrollwork, crystal knobs) or overly industrial (chunky pipe-style pulls). Sizing matters too, pulls should be proportional to the drawer or door, typically 3 to 5 inches for drawers, 1 to 2 inches for knobs.
Some transitional kitchens go handleless on uppers to keep sight lines clean, using touch-latch mechanisms. This works if your lowers have visible hardware to maintain some traditional detail.
How to Create a Transitional Kitchen: Step-by-Step Planning
Start with layout and function, style comes second. Transitional design supports any footprint: galley, L-shape, U-shape, or open-plan with an island.
Step 1: Assess your existing layout. If you’re renovating, decide whether walls, plumbing, or electrical need to move. Relocating a sink or range often requires permits and adds cost. Structural changes (removing load-bearing walls) require an engineer’s stamp and professional framing work.
Step 2: Choose your anchor elements. Pick cabinets, countertops, and flooring first, they’re the biggest visual and financial commitments. Use samples in your actual space: lighting changes how colors read. A “white” quartz may look cream under warm LEDs or blue-gray in north-facing light.
Step 3: Select a backsplash. Subway tile (3×6 inches) in white or light gray is a transitional staple. Install it in a classic brick pattern or vertical stack bond for subtle variation. Glass or ceramic tiles work: natural stone like marble or travertine adds texture but requires sealing. Avoid busy mosaics or patterned cement tiles, they lean too eclectic.
Step 4: Plan lighting zones. Kitchens need task, ambient, and accent lighting. Install recessed cans (4-inch or 6-inch, depending on ceiling height) for general light, pendant fixtures over islands, and under-cabinet LED strips for countertop tasks. Dimmer switches let you adjust mood and function.
Step 5: Factor in appliances. Stainless steel or panel-ready appliances both work. Panel-ready (cabinets that match the fridge and dishwasher fronts) creates a seamless, built-in look. If going stainless, choose brushed or smudge-proof finishes, high-gloss stainless shows every fingerprint.
Materials and Finishes for a Balanced Look
Transitional kitchens mix materials but keep the overall effect restrained. Avoid too many competing textures.
Countertops: Quartz is the go-to, durable, low-maintenance, and available in neutral tones with subtle veining. Expect $50–$120 per square foot installed, depending on brand and edge profile. Granite works too, especially in soft grays or whites. Marble is beautiful but porous: it’ll etch and stain unless you’re diligent with sealing. Butcher block on an island adds warmth but requires oiling every few months.
Backsplash: Ceramic or porcelain subway tile costs $5–$15 per square foot for materials: professional installation adds $10–$25 per square foot depending on layout complexity. A simple DIY backsplash is manageable if you’re comfortable with a wet saw and tile spacers. Use ¼-inch notched trowel for thin-set adhesive, and give it 24 hours to cure before grouting.
Flooring: Wide-plank engineered hardwood (5 to 7 inches wide) or luxury vinyl plank (LVP) both suit transitional style. Engineered wood offers real wood veneer over plywood core, more stable than solid hardwood in kitchens where humidity shifts. LVP is waterproof and ranges from $3–$8 per square foot: higher-end versions mimic wood grain convincingly. Avoid overly distressed or hand-scraped finishes: they skew too rustic.
Sinks and faucets: Undermount stainless steel or white fireclay farmhouse sinks are both transitional-friendly. Farmhouse (apron-front) sinks add traditional character: pair them with a modern gooseneck faucet in matte black or brushed nickel to keep balance. Single-handle pull-down faucets are practical for everyday use.
Lighting and Fixtures in Transitional Design
Lighting is where transitional design gets fun. You can blend a classic lantern-style pendant with sleek recessed cans, or pair industrial Edison bulbs with a traditional drum shade.
Pendant lights over an island should hang 30 to 36 inches above the countertop. For a standard 36-inch-tall island, that puts the bottom of the fixture around 66 to 72 inches from the floor, high enough to avoid head bonks, low enough to provide task light. Choose fixtures with simple lines: clear glass globes, metal cages, or drum shades in linen or white fabric.
Under-cabinet lighting is non-negotiable for task work. LED strip lights or puck lights work: strips give more even coverage. Install them toward the front edge of the cabinet base (not the back wall) to minimize shadows. Hardwiring is cleanest, but plug-in kits are a viable DIY option if you have accessible outlets.
Recessed lighting should be on a separate circuit from pendants and under-cabinet lights so you can control zones independently. Space recessed cans 4 to 6 feet apart for even coverage. Use 3000K LED bulbs (warm white) to avoid the harsh blue cast of daylight bulbs.
Statement fixtures, like a chandelier over a dining nook or a large pendant cluster, can lean slightly more traditional or modern, as long as the overall mix stays balanced. If your island pendants are modern glass globes, a traditional drum chandelier in the adjacent dining area won’t clash. Many inspiring transitional kitchen designs showcase how varied fixtures can coexist when the palette stays neutral.
Safety note: Any electrical work beyond replacing a fixture (adding new circuits, moving junction boxes) requires a licensed electrician and often a permit. Kitchen electrical must meet National Electrical Code (NEC) standards, including GFCI protection for countertop outlets.
For additional inspiration on layout and color choices, resources like The Kitchn offer real-world kitchen tours and design breakdowns. Similarly, browsing galleries on Homedit can help visualize how different materials and finishes interact in transitional spaces.
Final thought: Transitional design isn’t about following a strict rulebook, it’s about editing. Choose quality over quantity, balance over extremes, and don’t be afraid to let one or two elements shine while the rest stays understated. Whether you’re DIYing a cabinet refresh or coordinating a full gut renovation, this style rewards thoughtful planning and restraint.