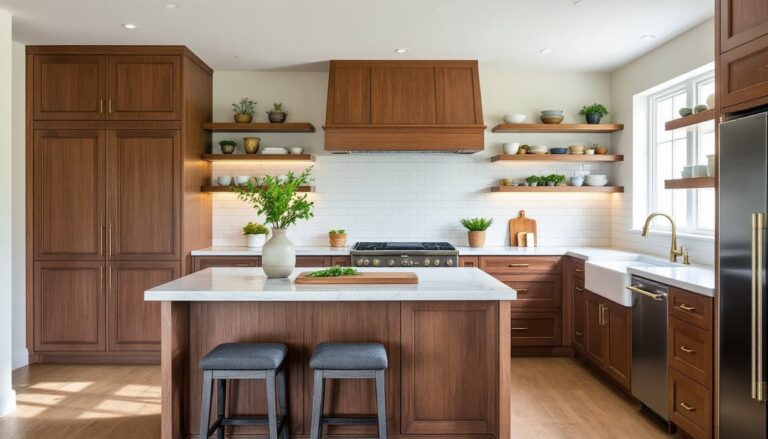

An L shaped kitchen isn’t just popular by accident, it’s one of the most versatile layouts a homeowner can choose, whether working with 100 square feet or 300. The design anchors two adjacent walls, creating a natural work zone while leaving the rest of the space open for islands, dining tables, or traffic flow. It works in compact apartments, suburban tract homes, and open-concept renovations alike. For DIYers planning a remodel or homeowners sketching out a new build, understanding how to maximize this layout means better storage, safer workflow, and a kitchen that actually fits how people cook, not just how magazines stage rooms.
Table of Contents
ToggleKey Takeaways
- An L shaped kitchen design maximizes two perpendicular walls while keeping at least two sides open, making it ideal for compact apartments, suburban homes, and open-concept layouts.
- The 90-degree corner in an L layout creates valuable storage opportunities—investing in pull-out hardware, lazy Susans, or magic corner units during the initial build prevents costly retrofits and eliminates dead space.
- Position the sink centrally on one leg with 24+ inches of counter space, the range 4–6 feet away with 15–18 inches of landing space on each side, and the refrigerator near the entry to maintain an efficient work triangle of 12–26 feet total.
- Maintain at least 48 inches of clearance between an island and the base cabinets for two-cook households; measure your space with painter’s tape before ordering cabinets to avoid workflow bottlenecks.
- Two-tone cabinetry, consistent flooring between the kitchen and adjacent living areas, and hardwired under-cabinet LED lighting on both legs enhance function and visual continuity in L shaped kitchen spaces.
- Avoid corner sinks, single ceiling fixtures, and placing the range directly in the apex—common mistakes that waste counter space, create shadows, and limit cooking flexibility in an L layout.
What Is an L Shaped Kitchen and Why Is It So Popular?
An L shaped kitchen uses two perpendicular runs of cabinetry and countertop that meet at a corner, forming an “L” footprint. One leg typically ranges from 8 to 12 feet, the other from 10 to 15 feet, though dimensions flex based on room size and door placement.
The layout became a residential standard in post-war American homes because it solved two problems at once: it kept the kitchen work zone compact (reducing steps between sink, stove, and fridge) while opening up sightlines to adjacent living or dining areas. Unlike galley kitchens, which can feel like hallways, or U-shaped plans that box you in, the L shape leaves at least two sides open.
Today’s popularity stems from adaptability. The layout handles both solo and multi-cook households, accommodates islands without crowding the room, and transitions smoothly into open-concept floor plans. It also suits irregular room shapes, offset doorways, angled walls, or rooms with windows on multiple sides, better than rigid galley or U configurations. For homeowners working with existing footprints, it’s often the path of least demolition.
Key Benefits of Choosing an L Shaped Kitchen Layout
Efficient use of corner space. The 90-degree turn creates a natural pivot point between tasks. Installing a lazy Susan or pull-out corner drawer system in the base cabinet turns what’s often dead space into usable storage for pots, small appliances, or dry goods.
Flexible traffic patterns. Because two sides remain open, the layout doesn’t force foot traffic through the work zone. Kids can grab snacks from the fridge without crossing in front of the stove. Guests can linger near an island without blocking the sink.
Scalable to room size. In a 10×10 kitchen, the L uses two walls and leaves room for a small table. In a 12×18 space, the same layout supports a 4×7-foot island with seating. The design doesn’t demand a specific square footage to function.
Easy phased remodels. Homeowners can update one leg at a time, replace cabinets on the longer run first, live with the old counters on the short leg, then finish phase two when budget allows. Galley or U-shaped kitchens make this harder because all cabinets tie into the work triangle simultaneously.
Natural zones for different tasks. Many designers place the sink and prep area on one leg, the range and oven on the other. This separates wet work from heat, reducing the chance of steam fogging up during multi-course cooking. When planning small kitchen solutions, the L shape often provides better separation than single-wall or galley alternatives.
Essential Design Elements for a Functional L Shaped Kitchen
Optimizing Storage and Counter Space
Base cabinets in an L kitchen typically run 24 inches deep (actual depth after doors: about 23 inches). Standard upper cabinets sit 12 to 15 inches deep. To avoid wasted corner real estate, consider these hardware upgrades:
- Blind corner pull-outs: Two-tier sliding shelves that extend fully, giving access to items tucked 30+ inches back.
- Magic corner units: Swing-out shelves that pivot from the cabinet’s corner post, maximizing retrieval without crawling.
- Diagonal corner sinks: Instead of forcing a right-angle cabinet join, some layouts angle the corner 45 degrees and center the sink there. This opens up counter space on both legs.
Counter space gets tricky at the corner join. Many homeowners lose 18 to 24 inches where the two runs meet because nothing fits there comfortably, not a cutting board, not a stand mixer. Solutions:
- Extend one leg 6 inches past the corner cabinet to create a usable landing zone for hot pots coming off the range.
- Spec a corner appliance garage with a tambour door to store toasters or blenders, freeing up the main counters.
- Use the corner for a small prep sink or dedicated coffee station, intentional activity beats dead space.
Aim for 36 to 42 inches of uninterrupted counter on at least one leg for prep work. If one run is only 8 feet and houses the range (30 inches) plus the fridge (36 inches), that leaves minimal landing. Push the fridge to an adjacent wall or plan an island to pick up the slack.
Incorporating the Work Triangle Principle
The work triangle, the invisible path connecting sink, stove, and refrigerator, should total 12 to 26 feet with no single leg longer than 9 feet. In an L layout, this usually breaks down as:
- Sink on the long leg, centered near a window if possible (plumbing runs are simpler when tying into exterior walls).
- Range on the short leg, 4 to 6 feet from the sink.
- Refrigerator at the end of one leg, ideally the one closer to the entry so people can grab drinks without entering the work zone.
Avoid placing the range or cooktop directly in the corner. A 30-inch range shoved into the apex creates tight clearances, pot handles bump the perpendicular cabinets, and the chef has no elbow room. Leave 15 to 18 inches of counter on at least one side of the range for landing hot pans.
If adding an island, keep 42 to 48 inches of clearance between the island edge and the L’s base cabinets. Tighter spaces work if only one cook uses the kitchen, but two people passing each other need 48 inches minimum. For design inspiration on balancing proportions, check examples of L-shaped kitchen layouts that prioritize workflow over square footage.
Best Styles and Finishes for L Shaped Kitchen Designs
Shaker cabinets remain the workhorse choice, five-piece doors with recessed center panels, available in paint-grade maple or stain-grade oak. For a traditional look, pair them with oil-rubbed bronze hardware and a subway tile backsplash. For modern or transitional styles, use flat-front slab doors in matte white or gray with stainless steel bar pulls.
Two-tone cabinetry works especially well in L kitchens. Paint base cabinets a darker color (navy, charcoal, forest green) and keep uppers white or light gray. This grounds the space visually and makes the layout feel less monotonous. Alternatively, treat the short leg as an accent, stain those cabinets walnut while painting the long leg.
Countertop material depends on use case and budget:
- Quartz (engineered stone): Low maintenance, consistent color, non-porous. Expect $60 to $120 per square foot installed. Good for busy households that won’t baby the surface.
- Granite: Natural variation, heat-resistant, requires annual sealing. Similar price range. Works if you like unique slabs.
- Butcher block: Warm, repairable, needs oiling. Best as a secondary surface on an island rather than the main L counter, where water exposure around the sink will be constant.
- Laminate: $20 to $50 per square foot installed. Modern laminates mimic stone convincingly. Don’t dismiss it for budget remodels.
For flooring, luxury vinyl plank (LVP) offers realistic wood or tile looks with waterproof cores, critical in kitchens. Porcelain tile (12×24-inch planks in a running bond or herringbone) adds durability but requires grout maintenance. If the L kitchen opens to a living area, continue the same flooring to visually expand both spaces.
Backsplash height matters. Standard is 18 inches between counter and upper cabinets, but many contemporary designs run tile (or slab stone) all the way to the ceiling, especially behind the range. This costs more but eliminates a grease-prone paint strip. Resources like Homedit showcase how finishes and materials interact in real installations, beyond showroom renderings.
Common Mistakes to Avoid When Designing Your L Shaped Kitchen
Ignoring the corner cabinet. Spec’ing a standard 36-inch blind base saves money up front but guarantees you’ll lose half that cabinet to inaccessible depth. Spend the extra $200 to $400 on pull-out hardware or a lazy Susan during the build, it’s harder and pricier to retrofit later.
Placing the sink in the corner. Unless using a custom angled cabinet, corner sinks create awkward reaches and waste counter space on both sides. Center the sink on one leg with at least 24 inches of counter on one side for dish staging.
Skimping on lighting. The L shape often puts one leg in shadow, especially if the room has a single ceiling fixture. Install under-cabinet LED tape or puck lights on both runs (hardwired, not battery-powered, those die fast). Add a pendant or two over an island if present, and consider a recessed canister above the range if there’s no range hood with integrated lighting.
Forgetting about the dishwasher door swing. If the dishwasher sits near the corner, its open door can block the perpendicular cabinet run. Leave at least 6 inches of clearance between the dishwasher and the return wall, or place it farther down the leg.
Not planning for electrical and plumbing access. Moving a sink to the opposite wall means rerouting drain and supply lines, often through a concrete slab or a floor joist bay. Moving a range from gas to the other wall requires a licensed plumber to run a new gas line and a permit in most jurisdictions. Map existing utilities before finalizing the layout: sometimes a “better” design costs $3,000 more just in rough-in work.
Choosing style over function in corner solutions. Open shelving looks great in renderings but corner open shelves collect dust and grease. Glass-front corner cabinets show off dishes but require constant tidying. If the household isn’t naturally tidy, stick with solid doors and internal organization.
Underestimating clearances for two cooks. A solo cook can work comfortably in a 42-inch aisle. Two people moving simultaneously need 48 inches minimum, 54 inches ideally. Measure your room with painter’s tape on the floor before ordering cabinets, it’s easier to adjust the plan than to live with a bottleneck for 15 years.